Automation has become a key tool for driving success and efficiency in digital marketing strategies. An automated workflow allows us to optimize and personalize our interactions with customers. It is an automated sequence of actions and communications triggered in response to specific events or behaviors of leads. These sequences enable us to deliver the right message to the right person at the right time, significantly impacting the effectiveness of our marketing campaigns.
The importance of workflows lies in their ability to offer a personalized and relevant experience to each individual. They allow us to segment our audience, nurture leads, send follow-up emails, automate repetitive tasks, and much more. By automating these processes, we can maximize our productivity and focus on delivering the highest possible value to our leads. The limits of what an automated workflow can achieve are determined by the creativity of the company that creates and uses it.
In this article, we provide you with a step-by-step tutorial to quickly and easily build your own automated workflow in FluxForce.
As an example to follow, we’ll use a workflow related to welcoming a new subscriber to our newsletter.
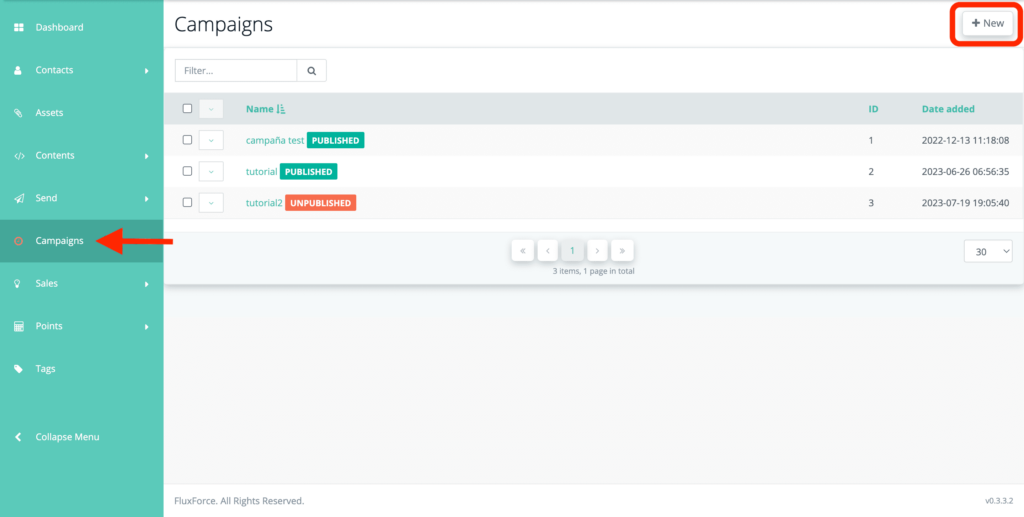
1. In your FluxForce account, go to the “Campaigns” section and click on “New.”
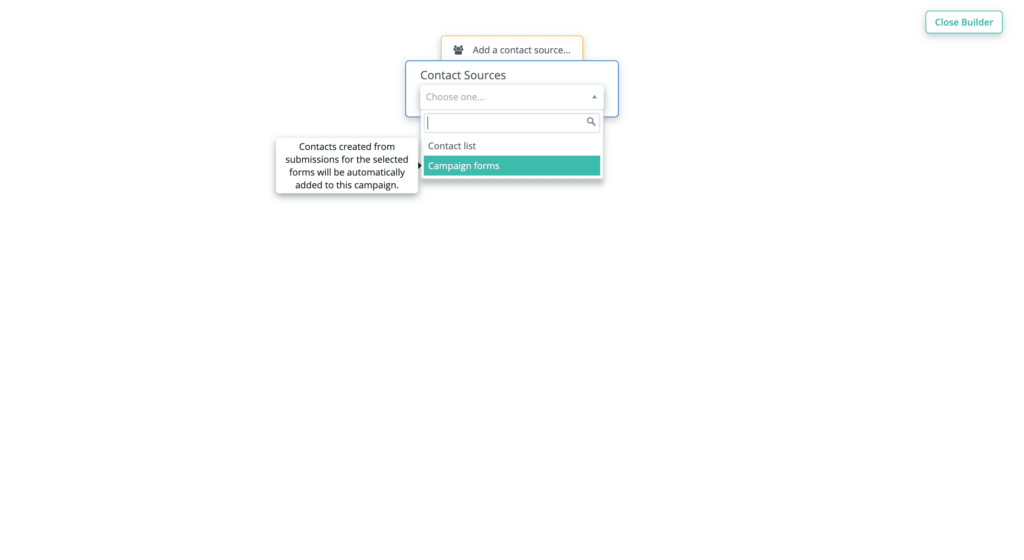
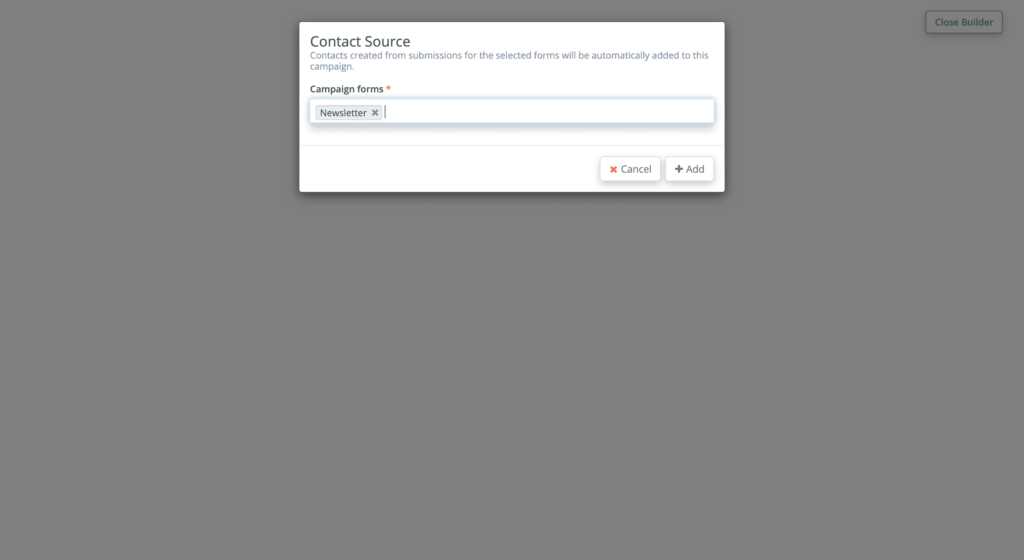
2. The campaign builder will open. Select the source of contacts for which you want to execute this campaign. The source can be a contact list or a campaign form. In the case that you choose a form, as we have done for this article, it must be specifically a campaign form that you have created before with the purpose of using it on your website or landing page. This way, the campaign will be automatically triggered when a contact fills out the form and presses the submit button.
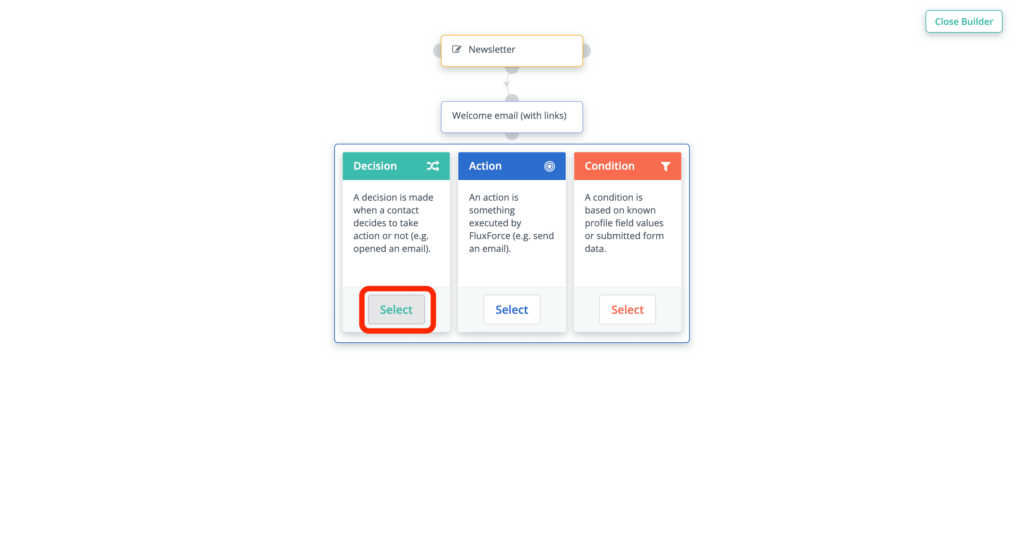
3. Click on the “+” sign below the box. You’ll see three options: Decision, Action, or Condition.
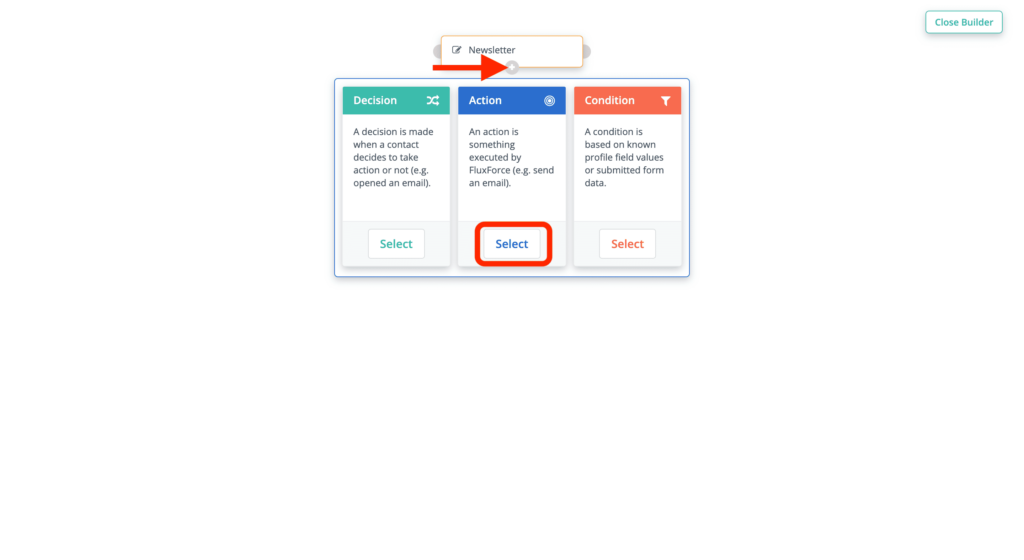
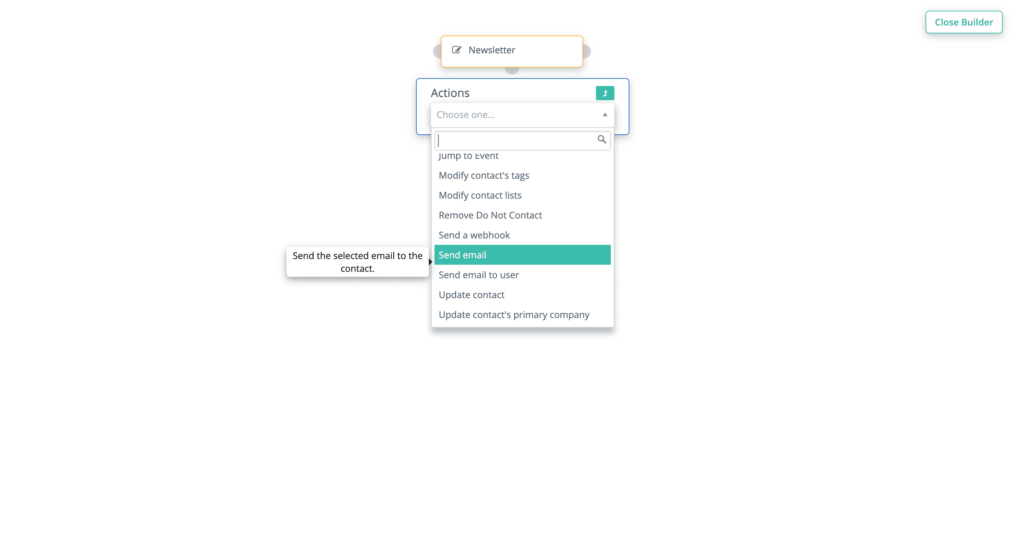
4. Let’s start by adding an Action. When you select this option, a dropdown will appear with all the possible actions you can perform through a campaign. For this example, we’ll send a welcome email.
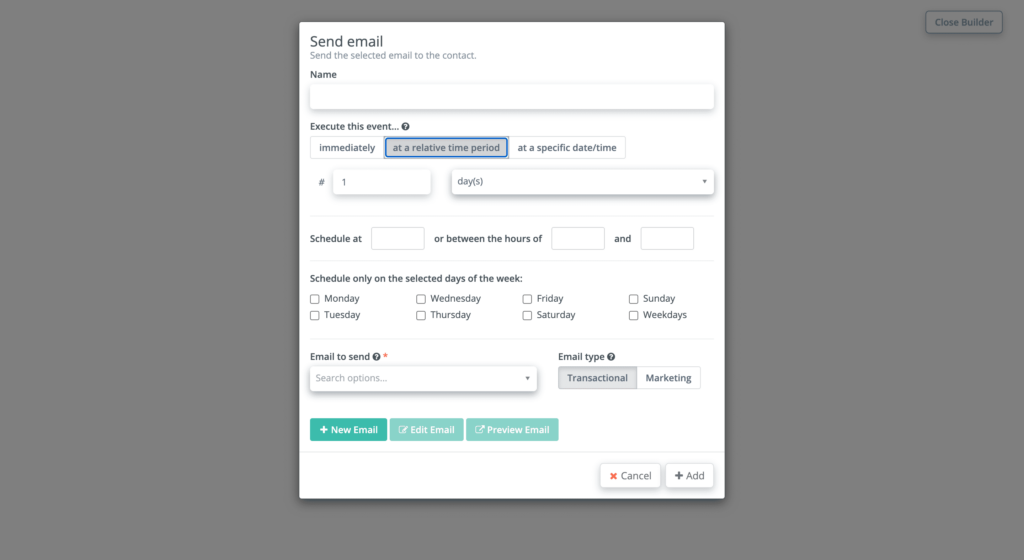
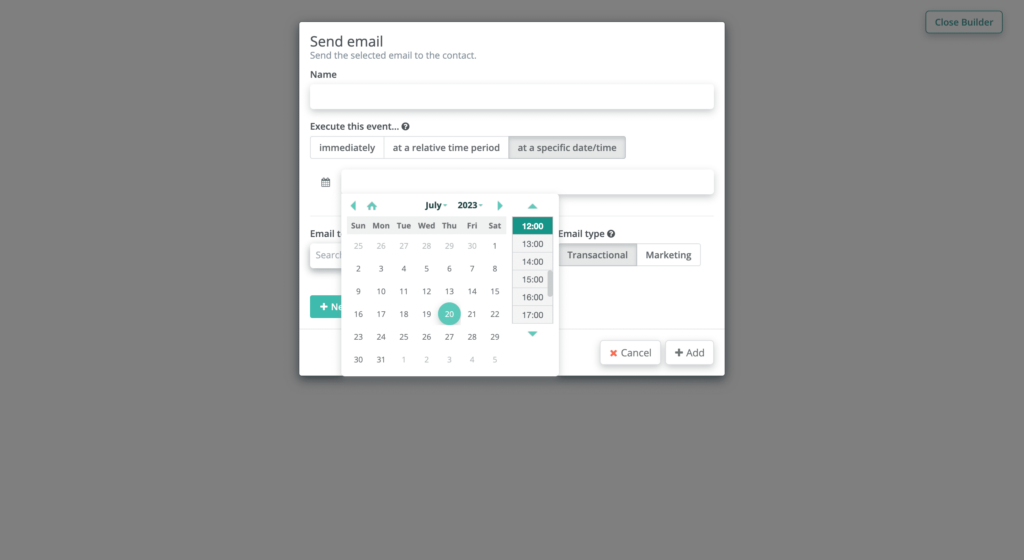
5. The platform will show you various options related to sending the email. Let’s start with the section “Execute this event…,” which is used to schedule when the email will be sent. As you can see, this can be done immediately when the campaign is executed, within a relative time period from the start of the campaign, or at a specific date and time.
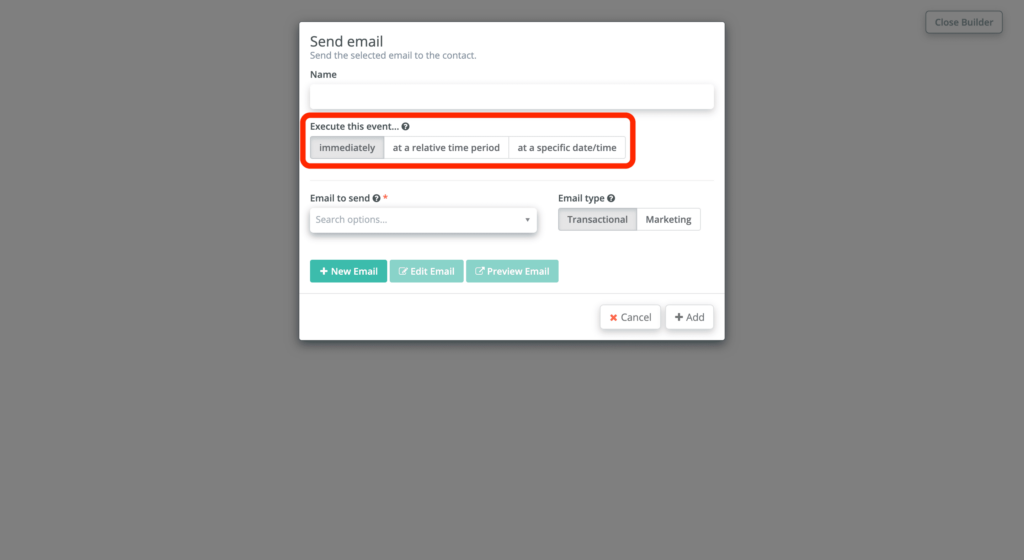
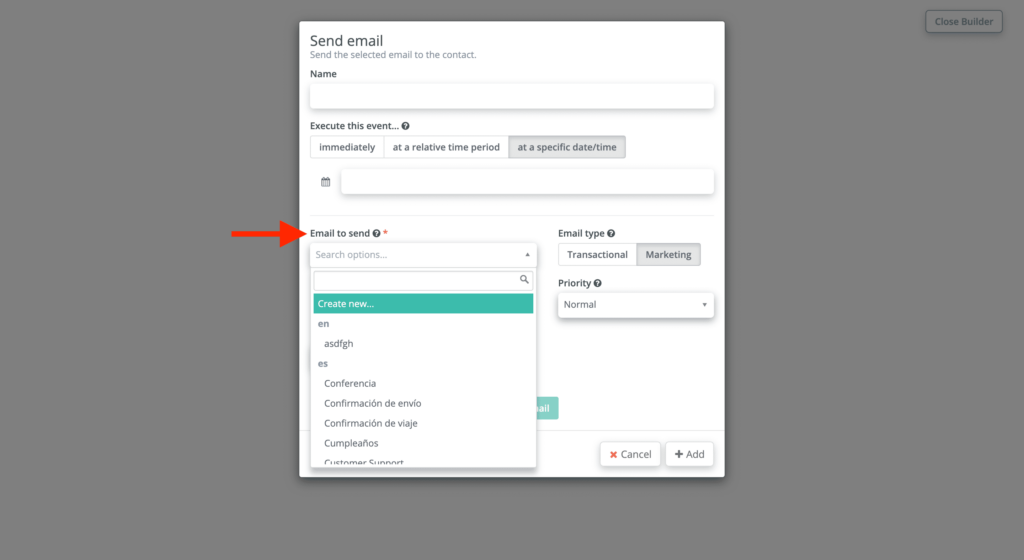
6. Choose the email you want to send. You can select a pre-existing email template or create a new one. If you choose the latter, the template builder will open in a new tab so you can customize the content of the email you want to send in this campaign action.
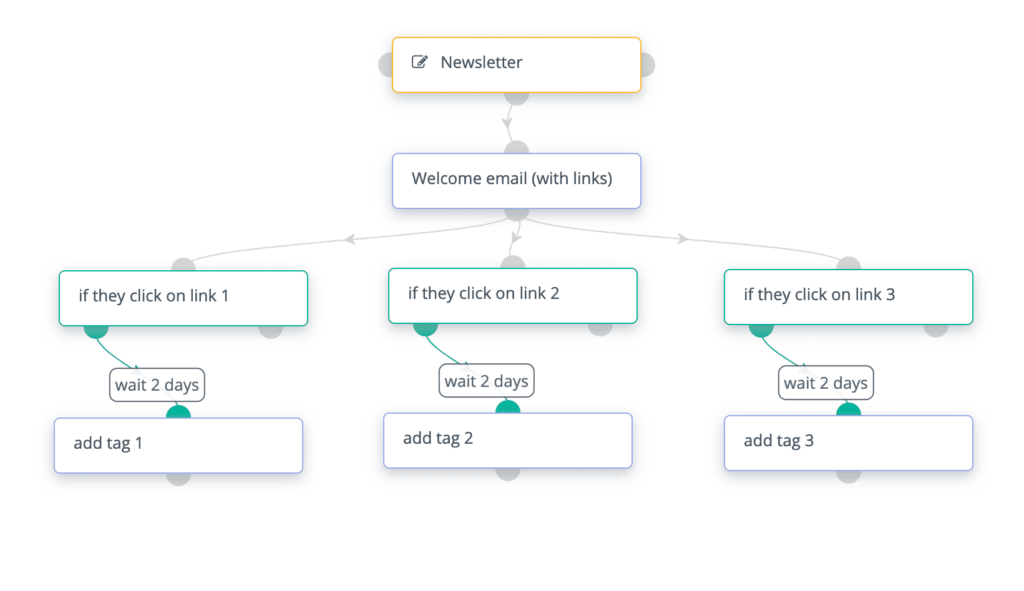
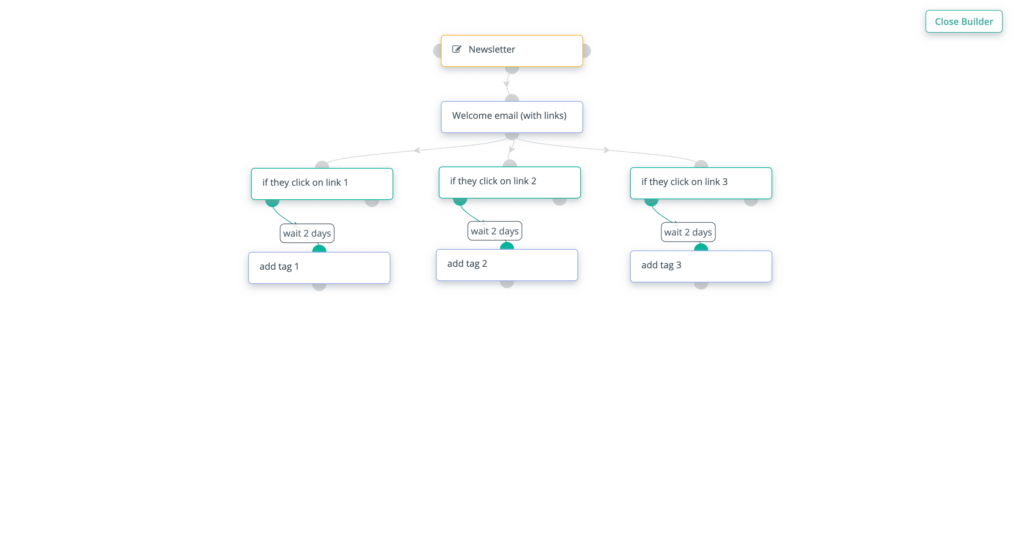
7. Once you’ve configured this first email, it’s time to add the next step of the campaign. In this case, we’ll add a decision based on which of the links included in the email has been clicked by the contacts who read it.
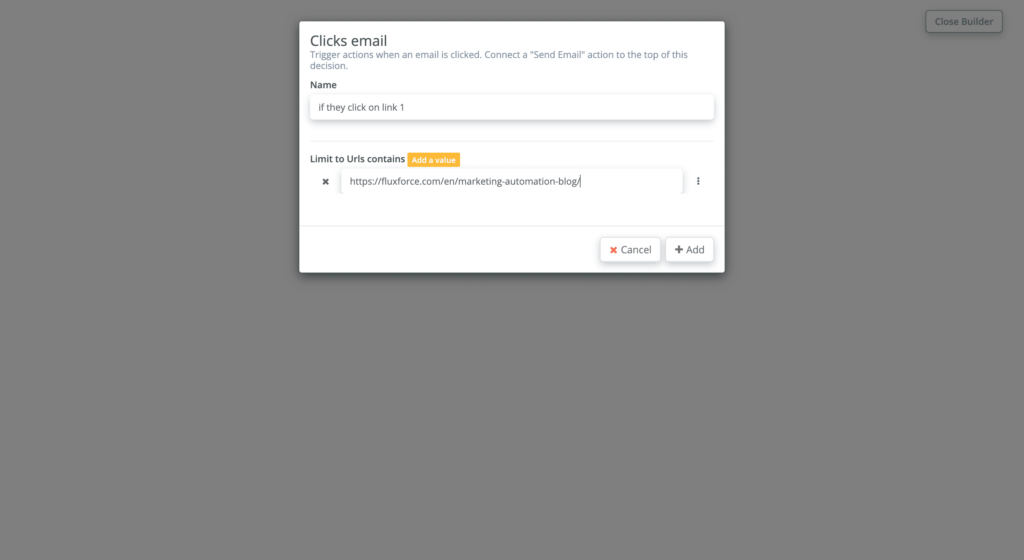
8. Select “Clicks email” to activate actions based on whether the contact clicks on a specific link.
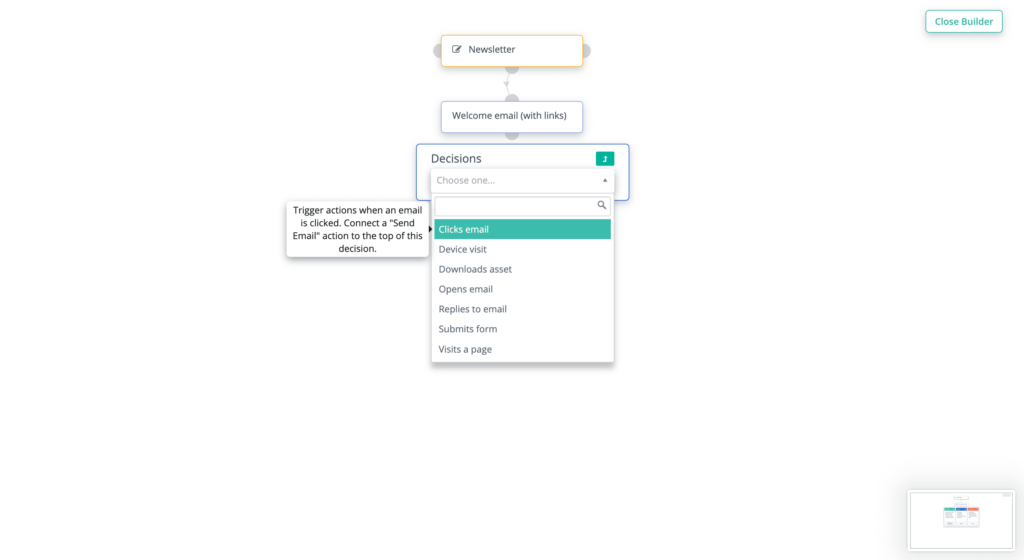
9. Paste the URL content into the box.
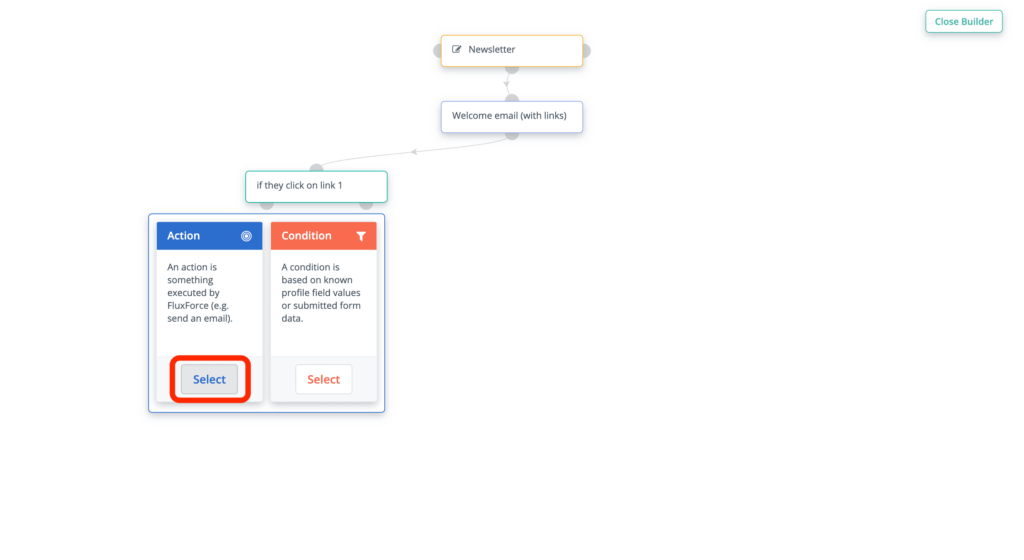
10. Next, add an Action that will be triggered based on the requirements set in the previous step.
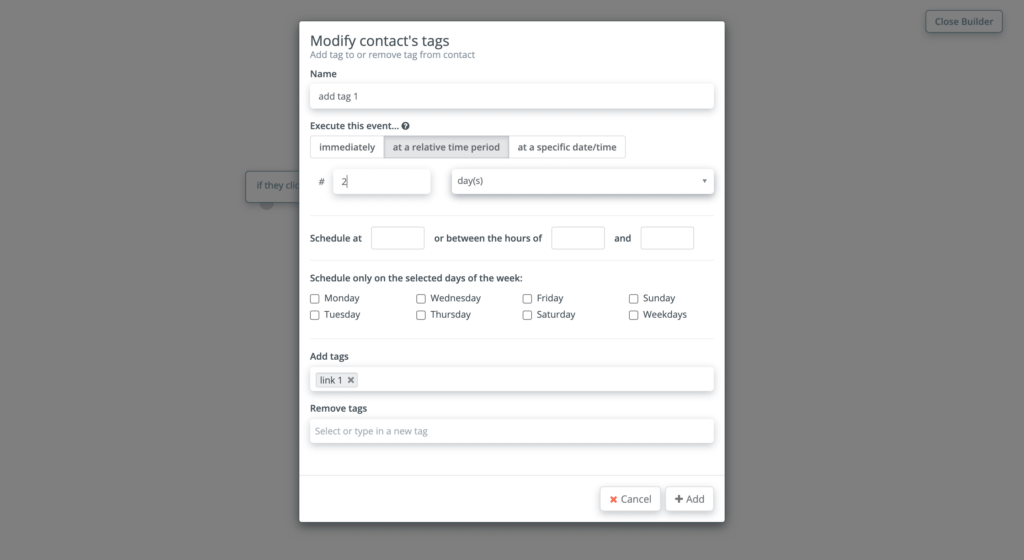
11. This time, we’ll select a different type of action, “Modify contact’s tags,” which allows you to add or remove tags to all contacts who meet the criteria of the previous step, i.e., those who clicked on link 1 in the received email. This way, you can segment your database based on the specific interests of each contact. For example, if you send an email containing links to different types of products, you’ll know exactly which products each contact is interested in purchasing, enabling you to target your future campaigns more specifically and effectively to each contact’s preferences.
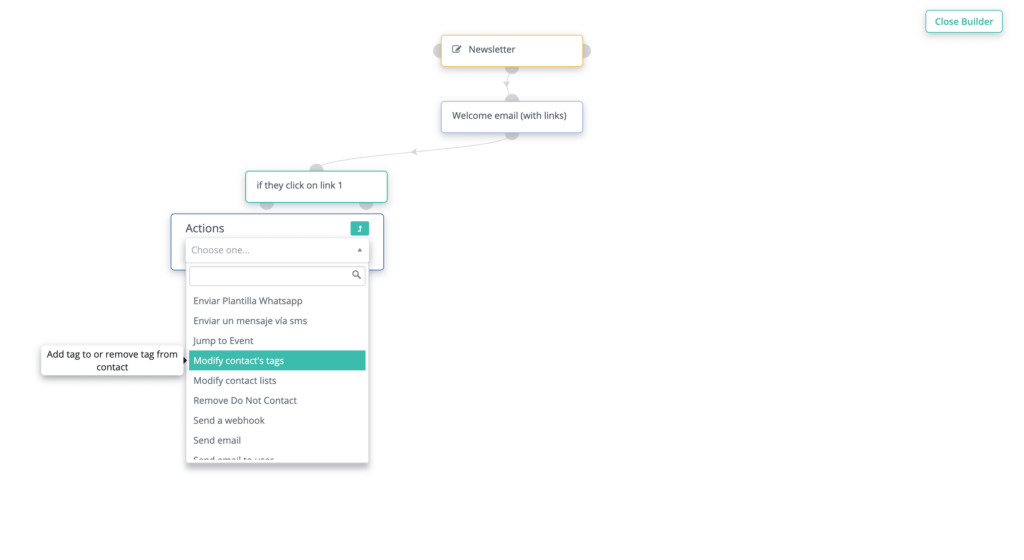
12. To do this, simply add the tags you want in the corresponding box. Just like when sending an email, you can program when this action will be executed. In this case, the corresponding tags will be added two days after the contact clicked on the link.
13. Repeat these steps (7-12) for each of the links you’ve included in the email. This way, based on the link the contacts have clicked, they will receive a corresponding tag. You can carry out this type of segmentation in several ways; there are many ways to customize your marketing campaigns to the maximum for each of your contacts, whether through tags, lists, or even individual actions within the campaign.
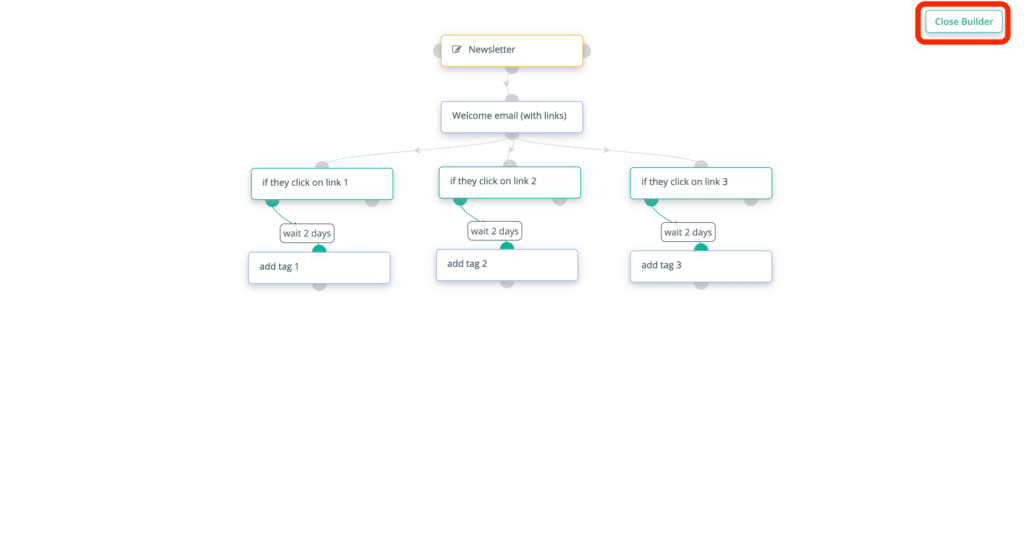
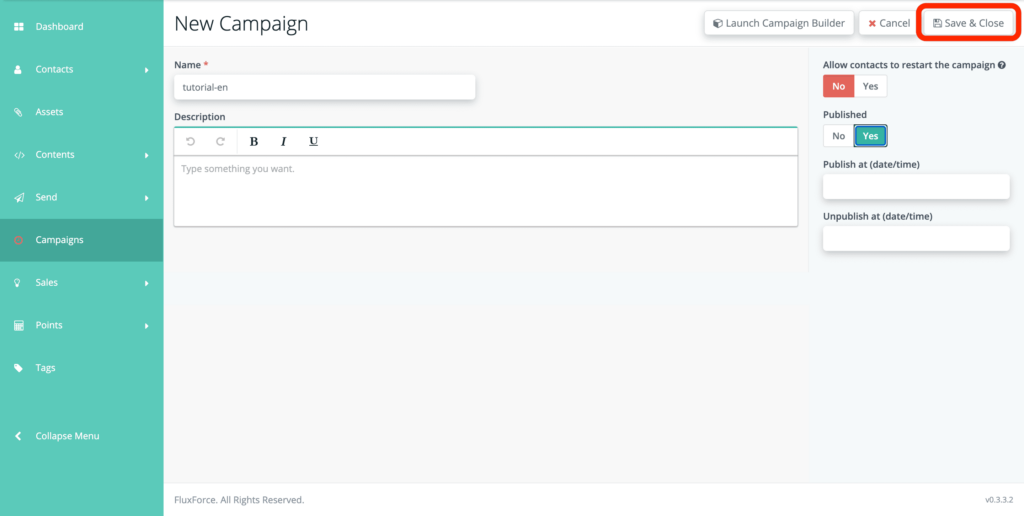
14. Click on “Close Builder”. Then, give your campaign a name.

15. If you want to publish it immediately, activate the “Published” button, which will turn green. You can also schedule it to launch at a specific date and time, just like you can schedule when it ends.
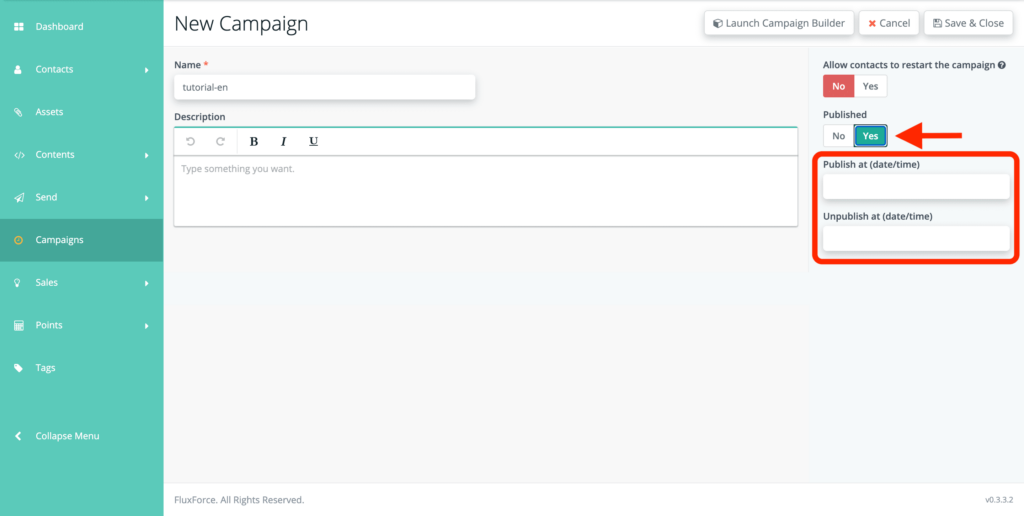
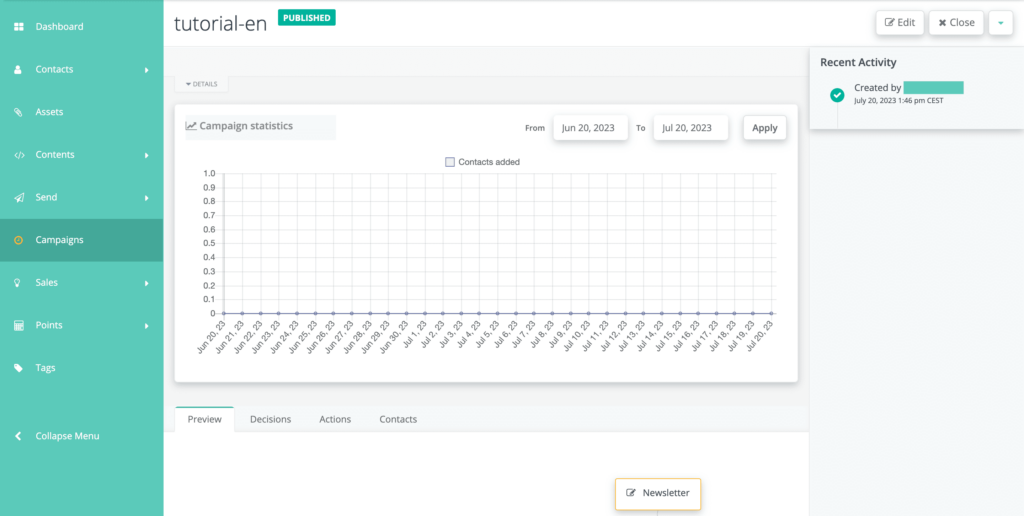
16. Once you’re done, click on “Save & Close.” You’ll see your campaign published and all its statistics, along with several tabs showing a preview, all the decisions, actions, and contacts within it. With this data, you can track all interactions and optimize your marketing strategy.
As you’ve seen, creating an automated workflow may seem complicated, but it’s actually very straightforward, and in FluxForce, it will only take you a few minutes to get it up and running. Providing an exceptional experience to your customers, guiding them to conversion, and fostering loyalty has never been so easy.
To enjoy all the benefits of FluxForce, register here.